This guide will walk you through setting up an AWS Elastic Kubernetes Service (EKS) cluster using Terraform. Following these steps, you can provision an EKS cluster on AWS and configure it for your specific requirements.
Prerequisites:
Terraform is installed on your local machine. AWS CLI installed and configured with appropriate IAM permissions.
If you are interested in utilizing the Terraform modules that I am currently developing, you can access them by visiting the following repository link:
Saurabh-DevOpsVoyager77/AWS-EKS-cluster-for-multiple-customers-Cluster-using-Terraform-Modules (github.com)
Now, let’s start creating terraform code for the AWS EKS cluster.
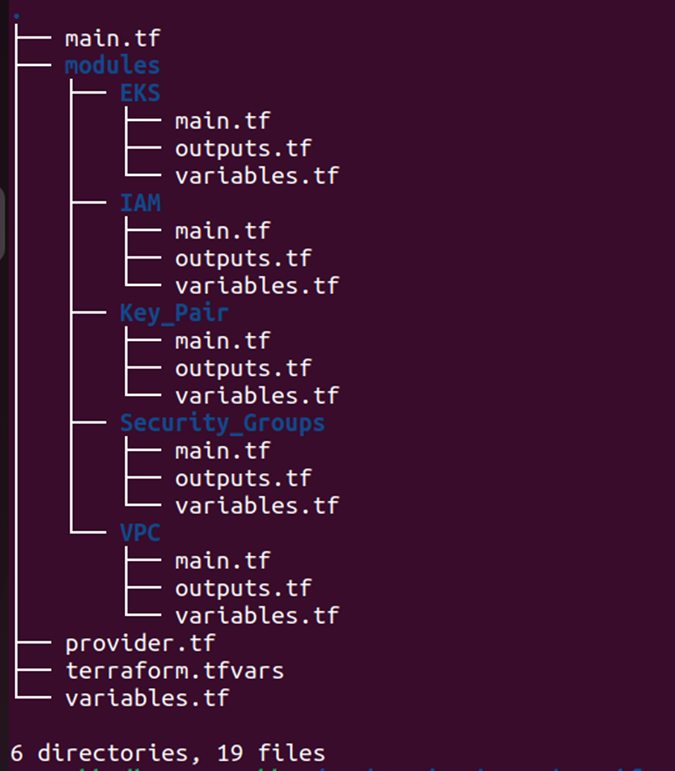
We will create the different modules for that. Here is the structure for that.

Step 1:- Create the module for VPC
Create main.tf file and add the below code to it.
# Creating VPC
resource "aws_vpc" "eks_vpc" {
  cidr_block           = var.vpc_cidr
  instance_tenancy     = "default"
  enable_dns_hostnames = true

  tags = {
    Name = "${var.project_name}-vpc"
    Env  = var.env
    Type = var.type
  }
}

# Creating Internet Gateway and attach it to VPC
resource "aws_internet_gateway" "eks_internet_gateway" {
  vpc_id = aws_vpc.eks_vpc.id

  tags = {
    Name = "${var.project_name}-igw"
    Env  = var.env
    Type = var.type
  }
}

# Using data source to get all Avalablility Zones in region
data "aws_availability_zones" "available_zones" {}

# Creating Public Subnet AZ1
resource "aws_subnet" "public_subnet_az1" {
  vpc_id                  = aws_vpc.eks_vpc.id
  cidr_block              = var.public_subnet_az1_cidr
  availability_zone       = data.aws_availability_zones.available_zones.names[0]
  map_public_ip_on_launch = true

  tags = {
    Name = "Public Subnet AZ1"
    Env  = var.env
    Type = var.type
  }
}

# Creating Public Subnet AZ2
resource "aws_subnet" "public_subnet_az2" {
  vpc_id                  = aws_vpc.eks_vpc.id
  cidr_block              = var.public_subnet_az2_cidr
  availability_zone       = data.aws_availability_zones.available_zones.names[1]
  map_public_ip_on_launch = true

  tags = {
    Name = "Public Subnet AZ2"
    Env  = var.env
    Type = var.type
  }
}

# Creating Route Table and add Public Route
resource "aws_route_table" "public_route_table" {
  vpc_id = aws_vpc.eks_vpc.id

  route {
    cidr_block = "0.0.0.0/0"
    gateway_id = aws_internet_gateway.eks_internet_gateway.id
  }

  tags = {
    Name = "Public Route Table"
    Env  = var.env
    Type = var.type
  }
}

# Associating Public Subnet in AZ1 to route table
resource "aws_route_table_association" "public_subnet_az1_route_table_association" {
  subnet_id      = aws_subnet.public_subnet_az1.id
  route_table_id = aws_route_table.public_route_table.id
}

# Associating Public Subnet in AZ2 to route table
resource "aws_route_table_association" "public_subnet_az2_route_table_association" {
  subnet_id      = aws_subnet.public_subnet_az2.id
  route_table_id = aws_route_table.public_route_table.id
}
Create variables.tf file and add the below code to it.
# Environment
variable "env" {
  type = string
}

# Type
variable "type" {
  type = string
}

# Stack name
variable "project_name" {
  type = string
}

# VPC CIDR
variable "vpc_cidr" {
  type    = string
  default = "10.0.0.0/16"
}

# CIDR of public subet in AZ1
variable "public_subnet_az1_cidr" {
  type    = string
  default = "10.0.1.0/24"
}

# CIDR of public subet in AZ2
variable "public_subnet_az2_cidr" {
  type    = string
  default = "10.0.2.0/24"
}
Create outputs.tf file and add the below code to it.
# VPC ID
output "vpc_id" {
  value = aws_vpc.eks_vpc.id
}

# ID of subnet in AZ1
output "public_subnet_az1_id" {
  value = aws_subnet.public_subnet_az1.id
}

# ID of subnet in AZ2
output "public_subnet_az2_id" {
  value = aws_subnet.public_subnet_az2.id
}

# Internet Gateway ID
output "internet_gateway" {
  value = aws_internet_gateway.eks_internet_gateway.id
}
Step 2:- Create the module for the Security Group
Create main.tf file and add the below code to it.
# Create Security Group for the EKS
resource "aws_security_group" "eks_security_group" {
  name   = "SH security group"
  vpc_id = var.vpc_id

  ingress {
    description = "SSH access"
    from_port   = 22
    to_port     = 22
    protocol    = "tcp"
    cidr_blocks = var.ssh_access
  }

  ingress {
    description = "HTTP access"
    from_port   = 80
    to_port     = 80
    protocol    = "tcp"
    cidr_blocks = var.http_access
  }

  ingress {
    description = "HTTPS port"
    from_port   = 443
    to_port     = 443
    protocol    = "tcp"
    cidr_blocks = var.http_access
  }

  egress {
    description = "outbound access"
    from_port   = 0
    to_port     = 0
    protocol    = -1
    cidr_blocks = ["0.0.0.0/0"]
  }

  tags = {
    Name = "${var.project_name}-EKS-security-group"
    Env  = var.env
    Type = var.type
  }
}
Create variables.tf file and add the below code to it.
# VPC ID
variable "vpc_id" {
  type = string
}

# Environment
variable "env" {
  type = string
}

# Type
variable "type" {
  type = string
}

# Stack name
variable "project_name" {
  type = string
}

# SSH Access
variable "ssh_access" {
  type = list(string)
}

# UI Access
variable "http_access" {
  type = list(string)
}
Create outputs.tf file and add the below code to it.
# EKS Security Group ID
output "eks_security_group_id" {
  value = aws_security_group.eks_security_group.id
}
Step 3:- Create the module for the Key Pair
Create a main.tf file and add the below code to it.
# AWS Key Pair
data "aws_key_pair" "project_key" {
  key_name           = var.key_name
  include_public_key = true
}
Create variables.tf file and add the below code to it.
# Key Name
variable "key_name" {}
Create outputs.tf file and add the below code to it.
# Key Pair ID
output "id" {
  value = data.aws_key_pair.project_key.id
}
Step 4:- Create the module for the IAM Role
Create main.tf file and add the below code to it.
# Creating IAM role for Master Node
resource "aws_iam_role" "master" {
  name = "EKS-Master"

  assume_role_policy = jsonencode({
    "Version" : "2012-10-17",
    "Statement" : [
      {
        "Effect" : "Allow",
        "Principal" : {
          "Service" : "eks.amazonaws.com"
        },
        "Action" : "sts:AssumeRole"
      }
    ]
  })
}

# Attaching Policy to IAM role
resource "aws_iam_role_policy_attachment" "AmazonEKSClusterPolicy" {
  policy_arn = "arn:aws:iam::aws:policy/AmazonEKSClusterPolicy"
  role       = aws_iam_role.master.name
}

# Attaching Policy to IAM role
resource "aws_iam_role_policy_attachment" "AmazonEKSServicePolicy" {
  policy_arn = "arn:aws:iam::aws:policy/AmazonEKSServicePolicy"
  role       = aws_iam_role.master.name
}

# Attaching Policy to IAM role
resource "aws_iam_role_policy_attachment" "AmazonEKSVPCResourceController" {
  policy_arn = "arn:aws:iam::aws:policy/AmazonEKSVPCResourceController"
  role       = aws_iam_role.master.name
}

# Creating IAM role for Worker Node
resource "aws_iam_role" "worker" {
  name = "ed-eks-worker"

  assume_role_policy = jsonencode({
    "Version" : "2012-10-17",
    "Statement" : [
      {
        "Effect" : "Allow",
        "Principal" : {
          "Service" : "ec2.amazonaws.com"
        },
        "Action" : "sts:AssumeRole"
      }
    ]
  })
}

# Creating IAM Policy for auto-scaler
resource "aws_iam_policy" "autoscaler" {
  name = "ed-eks-autoscaler-policy"
  policy = jsonencode({
    "Version" : "2012-10-17",
    "Statement" : [
      {
        "Action" : [
          "autoscaling:DescribeAutoScalingGroups",
          "autoscaling:DescribeAutoScalingInstances",
          "autoscaling:DescribeTags",
          "autoscaling:DescribeLaunchConfigurations",
          "autoscaling:SetDesiredCapacity",
          "autoscaling:TerminateInstanceInAutoScalingGroup",
          "ec2:DescribeLaunchTemplateVersions"
        ],
        "Effect" : "Allow",
        "Resource" : "*"
      }
    ]
  })
}

# Attaching Policy to IAM role
resource "aws_iam_role_policy_attachment" "AmazonEKSWorkerNodePolicy" {
  policy_arn = "arn:aws:iam::aws:policy/AmazonEKSWorkerNodePolicy"
  role       = aws_iam_role.worker.name
}

# Attaching Policy to IAM role
resource "aws_iam_role_policy_attachment" "AmazonEKS_CNI_Policy" {
  policy_arn = "arn:aws:iam::aws:policy/AmazonEKS_CNI_Policy"
  role       = aws_iam_role.worker.name
}

# Attaching Policy to IAM role
resource "aws_iam_role_policy_attachment" "AmazonSSMManagedInstanceCore" {
  policy_arn = "arn:aws:iam::aws:policy/AmazonSSMManagedInstanceCore"
  role       = aws_iam_role.worker.name
}

# Attaching Policy to IAM role
resource "aws_iam_role_policy_attachment" "AmazonEC2ContainerRegistryReadOnly" {
  policy_arn = "arn:aws:iam::aws:policy/AmazonEC2ContainerRegistryReadOnly"
  role       = aws_iam_role.worker.name
}

# Attaching Policy to IAM role
resource "aws_iam_role_policy_attachment" "x-ray" {
  policy_arn = "arn:aws:iam::aws:policy/AWSXRayDaemonWriteAccess"
  role       = aws_iam_role.worker.name
}

# Attaching Policy to IAM role
resource "aws_iam_role_policy_attachment" "s3" {
  policy_arn = "arn:aws:iam::aws:policy/AmazonS3ReadOnlyAccess"
  role       = aws_iam_role.worker.name
}

# Attaching Policy to IAM role
resource "aws_iam_role_policy_attachment" "autoscaler" {
  policy_arn = aws_iam_policy.autoscaler.arn
  role       = aws_iam_role.worker.name
}

resource "aws_iam_instance_profile" "worker" {
  depends_on = [aws_iam_role.worker]
  name       = "EKS-worker-node-profile"
  role       = aws_iam_role.worker.name
}
The above code will create the IAM role for the master and worker nodes and attach the necessary policy to it.
Create outputs.tf file and add the below code to it.
# IAM Worker Node Instance Profile
output "instance_profile" {
  value = aws_iam_instance_profile.worker.name
}

# IAM Role Master's ARN
output "master_arn" {
  value = aws_iam_role.master.arn
}

# IAM Role Worker's ARN
output "worker_arn" {
  value = aws_iam_role.worker.arn
}
Step 5:- Create the module for the EKS
Create main.tf file and add the below code to it.
# Creating EKS Cluster
resource "aws_eks_cluster" "eks" {
  name     = "AWS-EKS"
  role_arn = var.master_arn

  vpc_config {
    subnet_ids = [var.public_subnet_az1_id, var.public_subnet_az2_id]
  }

  tags = {
    key   = var.env
    value = var.type
  }
}

# Using Data Source to get all Avalablility Zones in Region
data "aws_availability_zones" "available_zones" {}

# Fetching Ubuntu 20.04 AMI ID
data "aws_ami" "amazon_linux_2" {
  most_recent = true

  filter {
    name   = "name"
    values = ["ubuntu/images/hvm-ssd/ubuntu-focal-20.04-amd64-server-*"]
  }

  filter {
    name   = "virtualization-type"
    values = ["hvm"]
  }

  owners = ["099720109477"]
}

# Creating kubectl server
resource "aws_instance" "kubectl-server" {
  ami                         = data.aws_ami.amazon_linux_2.id
  key_name                    = var.key_name
  instance_type               = var.instance_size
  associate_public_ip_address = true
  subnet_id                   = var.public_subnet_az1_id
  vpc_security_group_ids      = [var.eks_security_group_id]

  tags = {
    Name = "${var.project_name}-kubectl"
    Env  = var.env
    Type = var.type
  }
}

# Creating Worker Node Group
resource "aws_eks_node_group" "node-grp" {
  cluster_name    = aws_eks_cluster.eks.name
  node_group_name = "Worker-Node-Group"
  node_role_arn   = var.worker_arn
  subnet_ids      = [var.public_subnet_az1_id, var.public_subnet_az2_id]
  capacity_type   = "ON_DEMAND"
  disk_size       = 20
  instance_types  = [var.instance_size]

  remote_access {
    ec2_ssh_key               = var.key_name
    source_security_group_ids = [var.eks_security_group_id]
  }

  labels = {
    env = "Prod"
  }

  scaling_config {
    desired_size = 2
    max_size     = 2
    min_size     = 1
  }

  update_config {
    max_unavailable = 1
  }
}
Create variables.tf file and add the below code to it.
# Environment
variable "env" {
  type = string
}

# Type
variable "type" {
  type = string
}

# Stack name
variable "project_name" {
  type = string
}

# Public subnet AZ1
variable "public_subnet_az1_id" {
  type = string
}

# Public subnet AZ2
variable "public_subnet_az2_id" {
  type = string
}

# Security Group
variable "eks_security_group_id" {
  type = string
}

# Master ARN
variable "master_arn" {
  type = string
}

# Worker ARN
variable "worker_arn" {
  type = string
}

# Key name
variable "key_name" {
  type = string
}

# Worker Node & Kubectl instance size
variable "instance_size" {
  type = string
}
Create outputs.tf file and add the below code to it.
# EKS Cluster ID
output "aws_eks_cluster_name" {
  value = aws_eks_cluster.eks.id
}
Step 6:- Initialize the working directory
- Run the terraform init command in the working directory. It will download all the necessary providers, and all the modules & also initialize the backend as well.
Step 7:- Create a terraform plan
Run the terraform plan command in the working directory. It will give the execution plan.
terraform plan
Step 8:- Create a terraform apply
Run terraform apply command in the working directory. It will be going to create the Kubernetes cluster on AWS
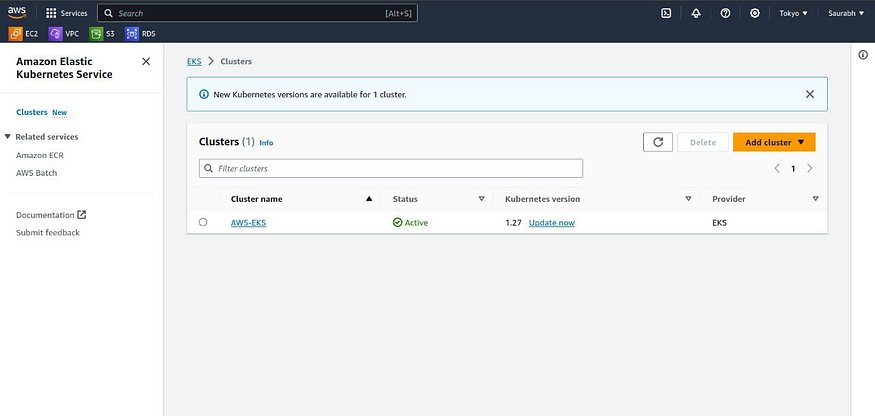
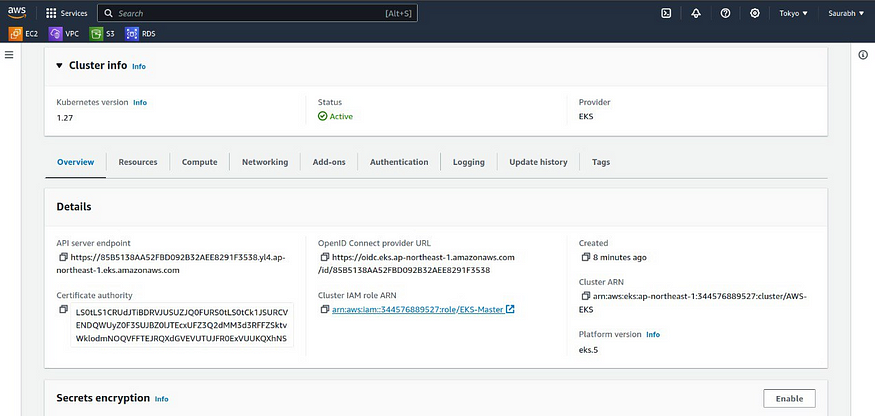
terraform applyTerraform will create the resources on AWS: VPC, Route Table, Security Group, Subnets, Internet Gateway, IAM Role, EKS Cluster
Go to AWS Console and search for EKS services, there you can see like this:


Step 9:- Launch & Configure Kubectl server
Run this commands:
curl -O https://s3.us-west-2.amazonaws.com/amazon-eks/1.23.17/2023-05-11/bin/linux/amd64

openssl sha1 -sha256 kubectl

chmod +x ./kubectl

mkdir -p $HOME/bin && cp ./kubectl $HOME/bin/kubectl && export PATH=$HOME/bin:$PATH

kubectl version --short –client

aws eks update-kubeconfig - name <your-cluster-name> - region <your-region>

kubectl get nodes
With this knowledge in your toolkit, you’ve successfully unlocked the art of crafting an AWS EKS cluster using Terraform. Feel free to explore, experiment, and customize it to your heart’s content!
If you found this guide to be a valuable resource, don’t hesitate to give it a round of applause by clicking on the 👏 button. Your feedback is greatly appreciated, so feel free to share your thoughts in the comments section.
Stay tuned for more engaging stories like this and thank you for your support! 😊📚
