


Harnessing the Power of Services: Your Superhighway to Reliable Communication
Kubernetes services, your trusty superhighways within the cluster, offer the power of abstraction. They simplify complex pod interactions, giving your applications a consistent, reliable connection. Say goodbye to network jargon; services are your gateway to seamless communication.
Services (Service | Kubernetes)
Services logically connect pods across the cluster to enable networking between them.
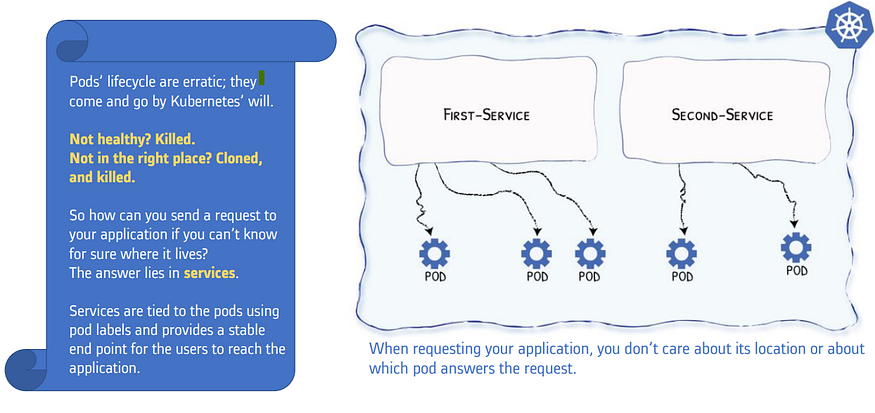
The lifetime of an individual pod cannot be relied upon; everything from their IP addresses to their very existence is prone to change.
Kubernetes doesn’t treat its pods as unique, long-running instances; if a pod encounters an issue and dies, it’s Kubernetes’ job to replace it so that the application doesn’t experience any downtime.
Services makes sure that even after a pod(back-end) dies because of a failure, the newly created pods will be reached by its dependency pods(front-end) via services. In this case, front-end applications always find the backend applications via a simple service (using service name or IP address) irrespective of their location in the cluster.
Services point to pods directly using labels. Services do not point to deployments or ReplicaSets. So, all pods with the same label get attached to the same service.
3 types: ClusterIP, NodePort and LoadBalancer
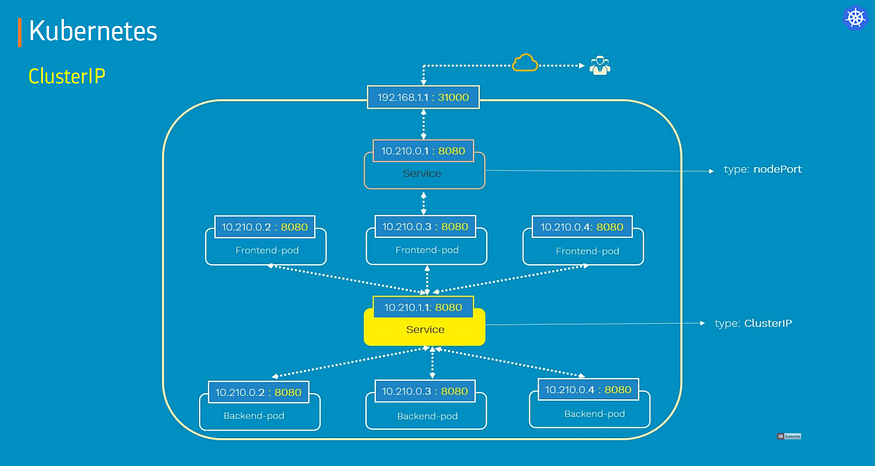
A. ClusterIP
ClusterIP service is the default Kubernetes service.
It gives you a service inside your cluster that other apps inside your cluster can access.
It restricts access to the application within the cluster itself and no external access.
Useful when a front-end app wants to communicate with back-end.
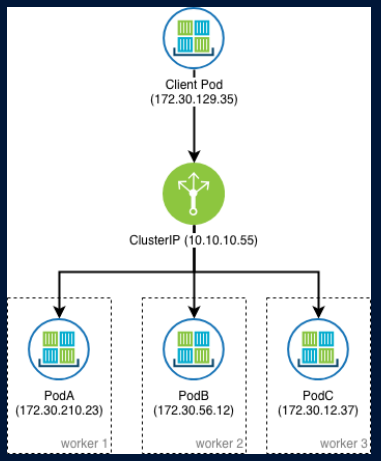
Each ClusterIP service gets a unique IP address inside the cluster.
Similar to — — links in Docker
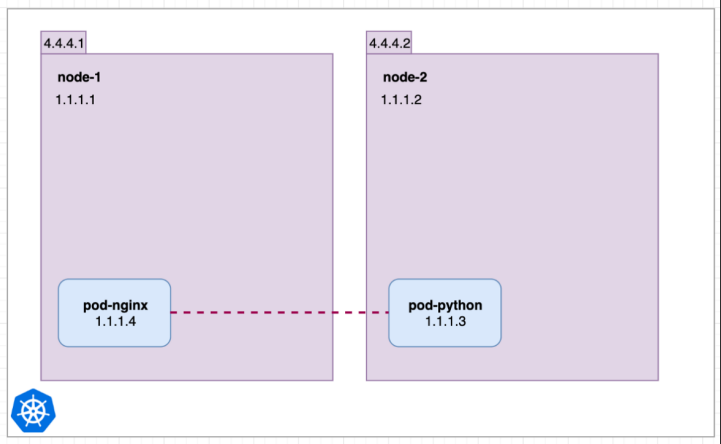
Let’s suppose When services are not available:
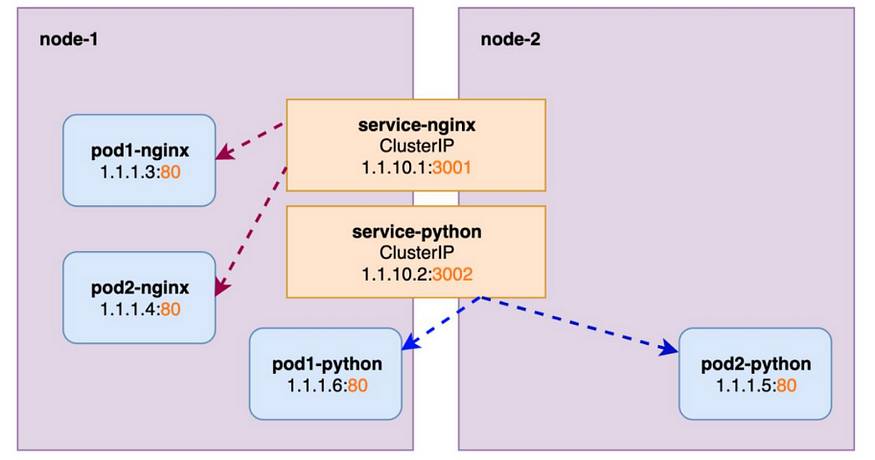
Imagine 2 pods on 2 separate nodes node-1 & node-2 with their local IP address.
pod-nginx can ping and connect to pod-python using its internal IP 1.1.1.3
Now let’s imagine the pod-python dies and a new one is created.
Now pod-nginx cannot reach pod python on 1.1.1.3 because its IP is changed to 1.1.1.5.
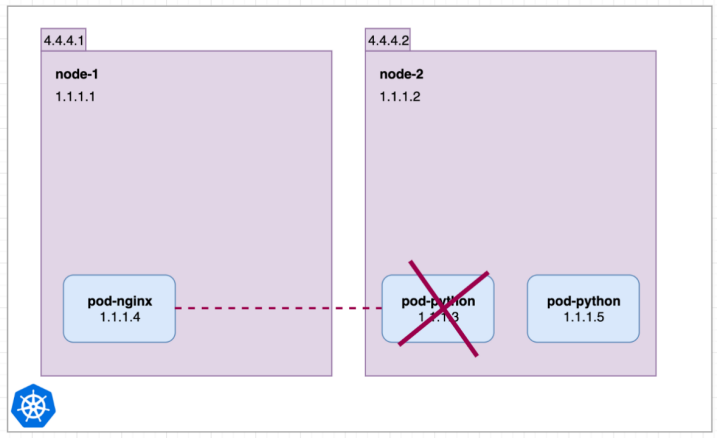
How do we remove this dependency???
Services logically connects pods together.
Unlike pods, a service is not scheduled on a specific node. It spans across the cluster.
Pod-nginx can always safely connect to pod-python using service IP 1.1.10.1 or the DNS name of service (service python).
Even if the python pod gets deleted and recreated again, nginx pod can still reach python pod using the service but not with IP of python pod directly.

- Multiple ClusterIP services
Let’s Dive into the example:
Create “clusterservice.yml”:
apiVersion: v1
kind: Service
metadata:
  name: ingress-nginx
spec:
  type: ClusterIP
  ports:
  - name: http
    port: 80
    targetPort: 80
    protocol: TCP
  selector:
    app: nginx-backend
Create “pod.yml”:
apiVersion: v1
kind: Pod
metadata:
  name: backend-pod
  labels:
    app: nginx-backend
spec:
  containers:
  - name: nginx-container
    image: nginx
    ports:
    - containerPort: 80
Now run both commands:
kubectl create –f clusterservice.yml
kubectl create –f pod.yml
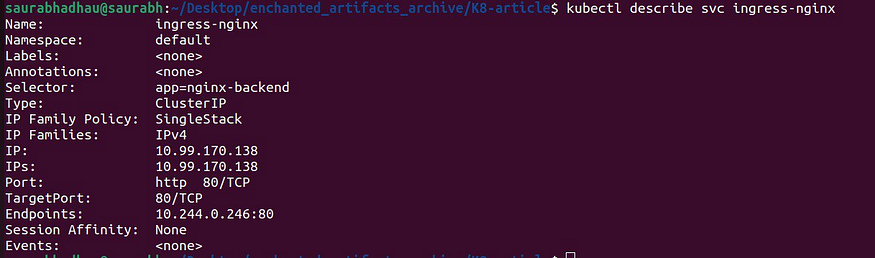
To see more details:
Kubectl describe svc <service-name>
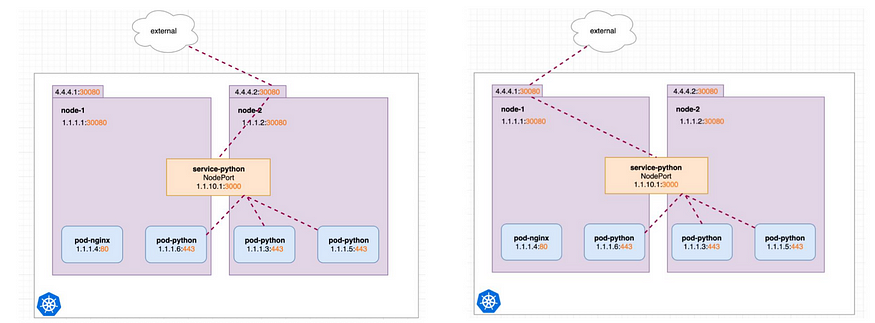
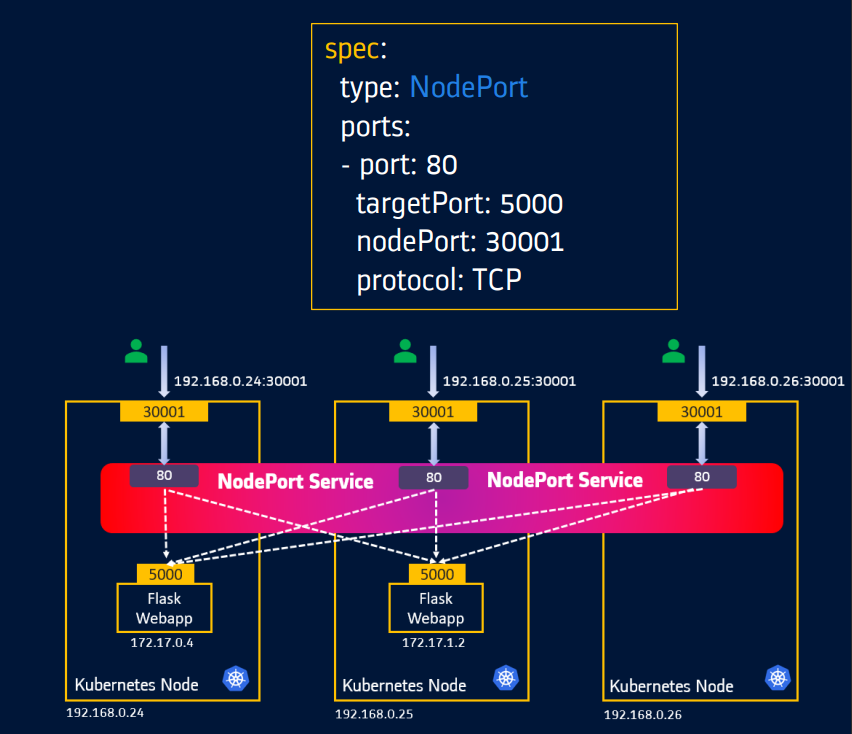
B. NodePort
NodePort opens a specific port on all the Nodes in the cluster and forwards any traffic that is received on this port to internal services.
Useful when front-end pods are to be exposed outside the cluster for users to access it.
NodePort is built on top of the ClusterIP service by exposing the ClusterIP service outside of the cluster.
NodePort must be within the port range 30000- 32767.
If you don’t specify this port, a random port will be assigned. It is recommended to let k8s auto-assign this port.
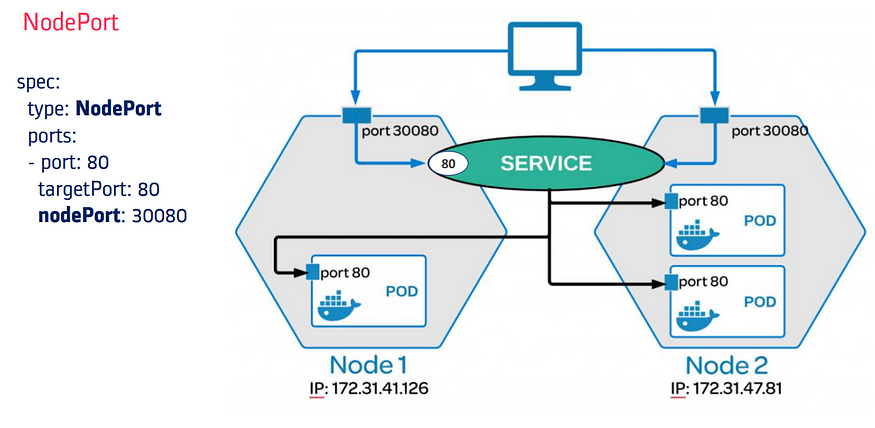
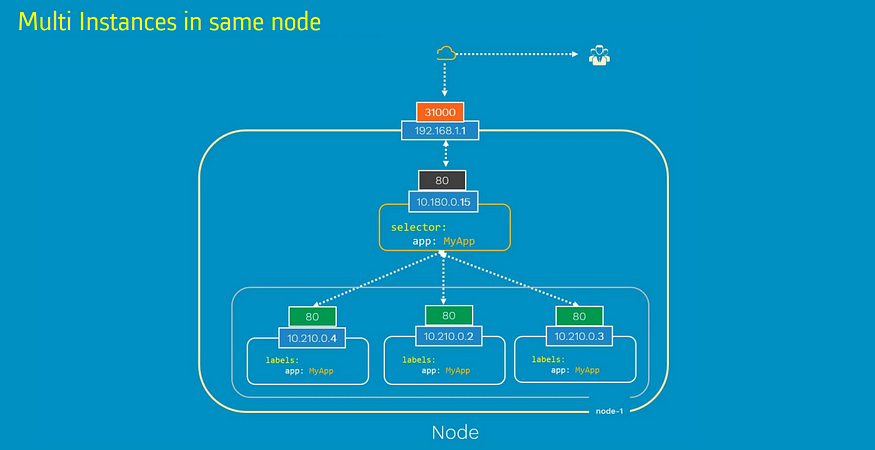
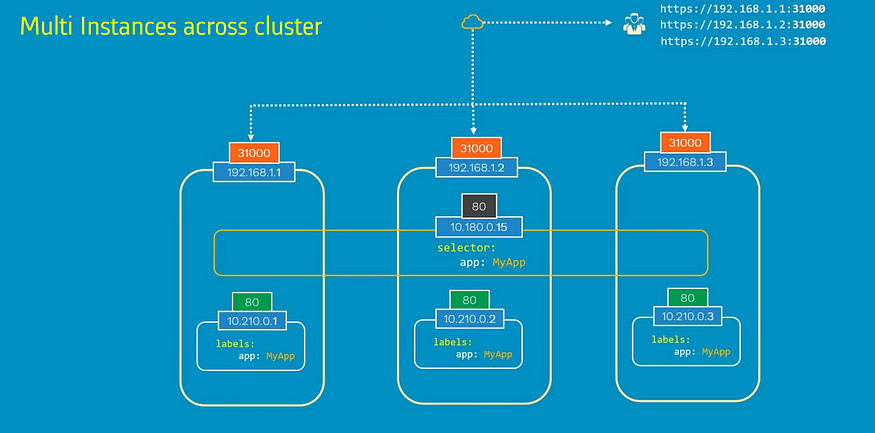
- An application can be reached from any of the available nodes in the cluster using <node_IP>:<node_port>
Let’s Dive into the example:
Create “nodeport-service.yml”:
apiVersion: v1
kind: Service
metadata:
  name: nodeport-service
spec:
  type: NodePort
  ports:
    - port: 80
      targetPort: 80
      nodePort: 30001
      protocol: TCP
  selector:
    app: nginx-frontend
Create “pod.yml”:
apiVersion: v1
kind: Pod
metadata:
  name: nginx-frontend
  labels:
    app: nginx-frontend
spec:
  containers:
    - name: nginx-container
      image: nginx
      ports:
        - containerPort: 80
Now run both commands:
kubectl create –f nodeport-service.yml
kubectl create –f pod.yml
Now your NodePort Service is successfully created:
kubectl get svc

To see more details:
Kubectl describe svc <service-name>
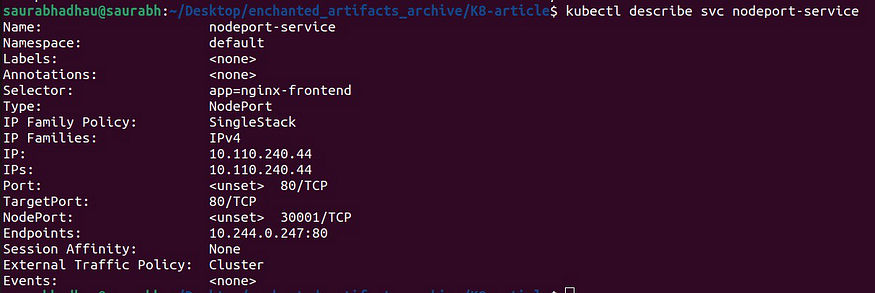
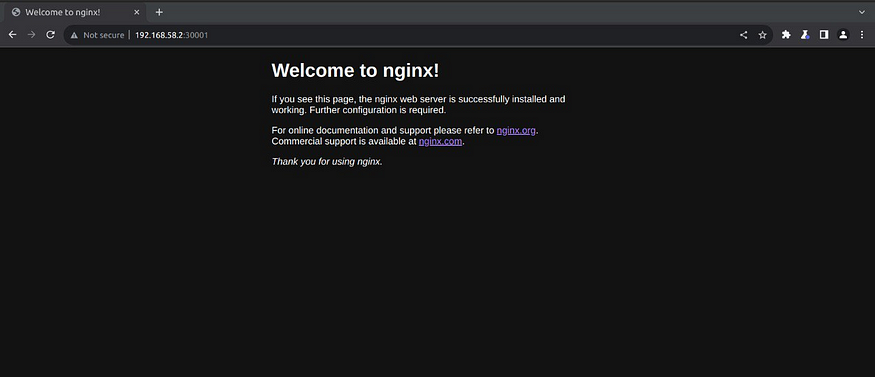
So Now you can access your application at IP of the Minikube and NodePort (Here it is mine)
NodePort Limitations
In the NodePort service, users can access the application using the URL http://<node_IP>:<node_port>
In the Production environment, we do not want the users to have to type in the IP address every time to access the application.
So we configure a DNS server to point to the IP of the nodes. Users can now access the application using the URL http://xyz.com:30001
Now, we don’t want the user to have to remember port number either.
However, NodePort service can only allocate high numbered ports which are greater than 30,000.
So we deploy a proxy server between the DNS server and the cluster that proxies requests on port 80 to port 30001 on the nodes.
We then point the DNS to proxy server’s IP, and users can now access the application by simply visiting http://xyz.com
Note: NodePort 30001 is being used only for demo. You can configure this port number in the service manifest file or let K8s auto-assign for you.
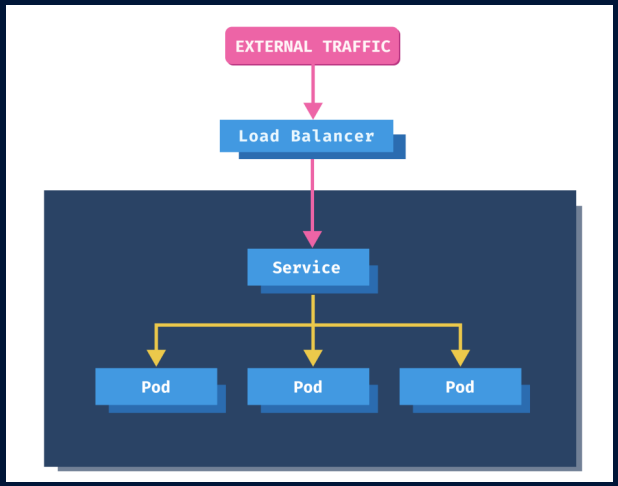
C. Load Balancer
A LoadBalancer service is the standard way to expose a Kubernetes service to the internet.
All traffic on the port you specify will be forwarded to the service.
There is no filtering, no routing, etc. This means you can send almost any kind of traffic to it, like HTTP, TCP, UDP or WebSocket.
Few limitations with LoadBalancer: 1. Every service exposed will get its own IP address. 2. It gets very expensive to have external IP for each of the services (application)
You can create “loadbalancer-service.yml”:
apiVersion: v1
kind: Service
metadata:
  name: lb-service
  labels:
    app: hello
spec:
  type: LoadBalancer
  selector:
    app: hello
  ports:
    - port: 80
      targetPort: 80
      protocol: TCP
You can indeed create this service, but remember, it won’t be assigned an IP address. Let me explain why:
On Google Cloud, AWS, or Azure, a service type of LoadBalancer in the service manifest file will immediately run an Elastic / Cloud Load Balancer that assigns externally IP (public IP) to your application.
But for on-prem or bare-metal k8s clusters, this functionality is not available.
Using service type as LoadBalancer on bare-metal will not assign any external IP and service resource will remain in Pending state forever.
As you can see here:

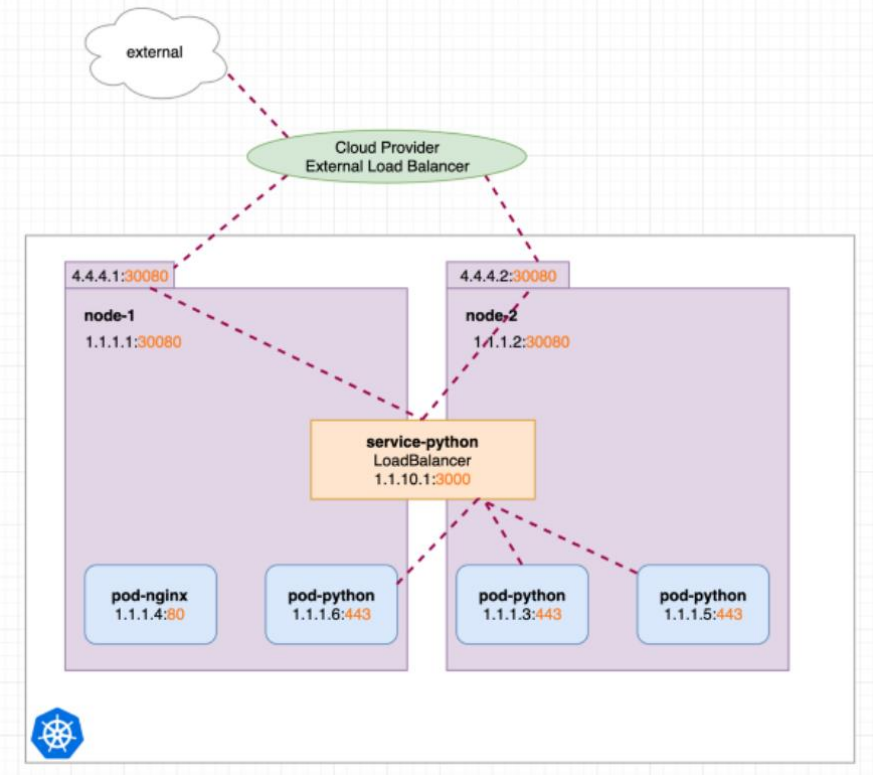
Application can be reached using the external IP assigned by the LoadBalancer.
The LoadBalancer will forward the traffic to the available nodes in the cluster on the nodePort assigned to the service.
Cloud LoadBalancer: Cons
Every service exposed will gets it’s own IP address.
It gets very expensive to have external IP for each of the service(application).
We see two LoadBalancers, each having its own IP. If we send a request to LoadBalancer 22.33.44.55 it gets redirected to our internal service-nginx. If we send the request to 77.66.55.44 it gets redirected to our internal service-python.
This works great! But IP addresses are rare and LoadBalancer pricing depends on the cloud providers. Now imagine we don’t have just two but many more internal services for which we would like to create LoadBalancers, costs would scale up.
Might there be another solution which allows us to only use one LoadBalancer (with one IP) but still reach both of our internal services directly?.

In conclusion, 🚀 we’ve taken a thrilling journey through the Kubernetes universe, exploring the superpowers of ClusterIP, NodePort, and Load Balancer services. With these tools in your arsenal, you’re well-prepared to conquer the container orchestration world! 🌍✨
Stay tuned for more Kubernetes adventures, and don’t forget to like and share if you’ve enjoyed the ride. 🤗👍📢