Streamlining AI Deployment: Configuring Route 53 and ACM for Your ChatGPT Clone App
Introduction
In our previous article (https://devopsvoyager.hashnode.dev/streamlining-ai-deployment-launching-chatgpt-clone-app-with-kubernetes-terraform-and-jenkins-cicd), we successfully deployed a ChatGPT clone application using Kubernetes, Terraform, and Jenkins for CI/CD. We’ll take the next step by enhancing our setup with a custom domain, secure TLS certificates, and proper DNS configuration using AWS services. This article will guide you through creating a domain using Route 53, generating a TLS certificate with AWS Certificate Manager, and attaching a subdomain to publish your AI application successfully.
Setting Up Your Domain in Route 53
To start, you need a domain name for your application. You can purchase a domain through Route 53.
Steps to Create a Domain:
A. Log in to the AWS Management Console.
B. Navigate to Route 53:
Go to the Route 53 dashboard.
Click on "Registered Domains."
C. Register a New Domain:
- Choose "Register Domain" and follow the prompts to select and register your desired domain.

Creating a Hosted Zone:
Once your domain is registered, the Hosted zone to manage DNS records will be automatically created, If not then follow the procedure below.
In Route 53, click on "Hosted Zones."
Click "Create Hosted Zone."
Enter your domain name and select the type as "Public Hosted Zone."
Click "Create."
Creating a TLS Certificate with AWS Certificate Manager
For a secure connection to your application, you need to create a TLS certificate. AWS Certificate Manager (ACM) simplifies this process.
Steps to Create a TLS Certificate:
A. Navigate to AWS Certificate Manager.

B. Request a Public Certificate:
Click "Request a certificate."
Choose "Request a public certificate" and click "Next."

- Enter your domain name (e.g.,
ai.yourdomain.com) and any additional subdomains if needed. In my case what I'm doing, is creating a certificate for my domain and the sub-domains too, So here I'm using a wildcard certificate. My suggestion is to use a wildcard certificate because a single certificate will be valid for all your sub-domains.
C. Validation Method:
Choose "DNS validation" to verify your domain ownership.
Click "Next" and then "Review" to confirm your request.

D. Add DNS Records:
Once the certificate request is submitted, ACM will provide DNS records to add to your Route 53 hosted zone for validation. Add these records accordingly.
So as you can see in this article (https://devopsvoyager.hashnode.dev/streamlining-ai-deployment-launching-chatgpt-clone-app-with-kubernetes-terraform-and-jenkins-cicd) We have ran this command :
kubectl apply -f chatbot-ui.yamlto deploy the application. So what we need to do now is that we need to set up the Nginx Ingress Controller.

E. Setup Nginx Ingress Controller
Run this command:
curl -LO https://raw.githubusercontent.com/kubernetes/ingress-nginx/main/deploy/static/provider/cloud/deploy.yaml && kubectl apply -f deploy.yaml
Then do, to see ingress :
kubectl get ing
F. Create certificate
We can follow the two steps here:
Can create a certificate using K8s and Integrate with Route53 or
Can create a certificate using ACM and Integrate with Route53
But we will see both the process:
1. Here we'll create a certificate using k8s and then integrate it with Route53
Create a file
  #clusterissuer.yaml
  apiVersion: cert-manager.io/v1
  kind: ClusterIssuer
  metadata:
    name: letsencrypt-prod
  spec:
    acme:
      # URL for the ACME server (Let's Encrypt production)
      server: https://acme-v02.api.letsencrypt.org/directory
      email: xyz@gmail.com # Your email for notifications
      privateKeySecretRef:
        name: letsencrypt-prod-key
      solvers:
        - http01:
            ingress:
              class: nginx
#certificate.yaml apiVersion: cert-manager.io/v1 kind: Certificate metadata: name: secret-ai spec: secretName: secret-ai issuerRef: name: letsencrypt-prod kind: ClusterIssuer commonName: Your-SubDomain dnsNames: - Your-SubDomainConfigure Ingress
  #ingress.yaml
  apiVersion: networking.k8s.io/v1
  kind: Ingress
  metadata:
    name: app-ingress
    annotations:
      cert-manager.io/cluster-issuer: "letsencrypt-prod"
  spec:
    ingressClassName: nginx
    tls:
      - hosts:
          - Your-SubDomain
        secretName: secret-ai
    rules:
      - host: Your-Domain
        http:
          paths:
            - path: /
              pathType: Prefix
              backend:
                service:
                  name: chatbot-service
                  port:
                    number: 80
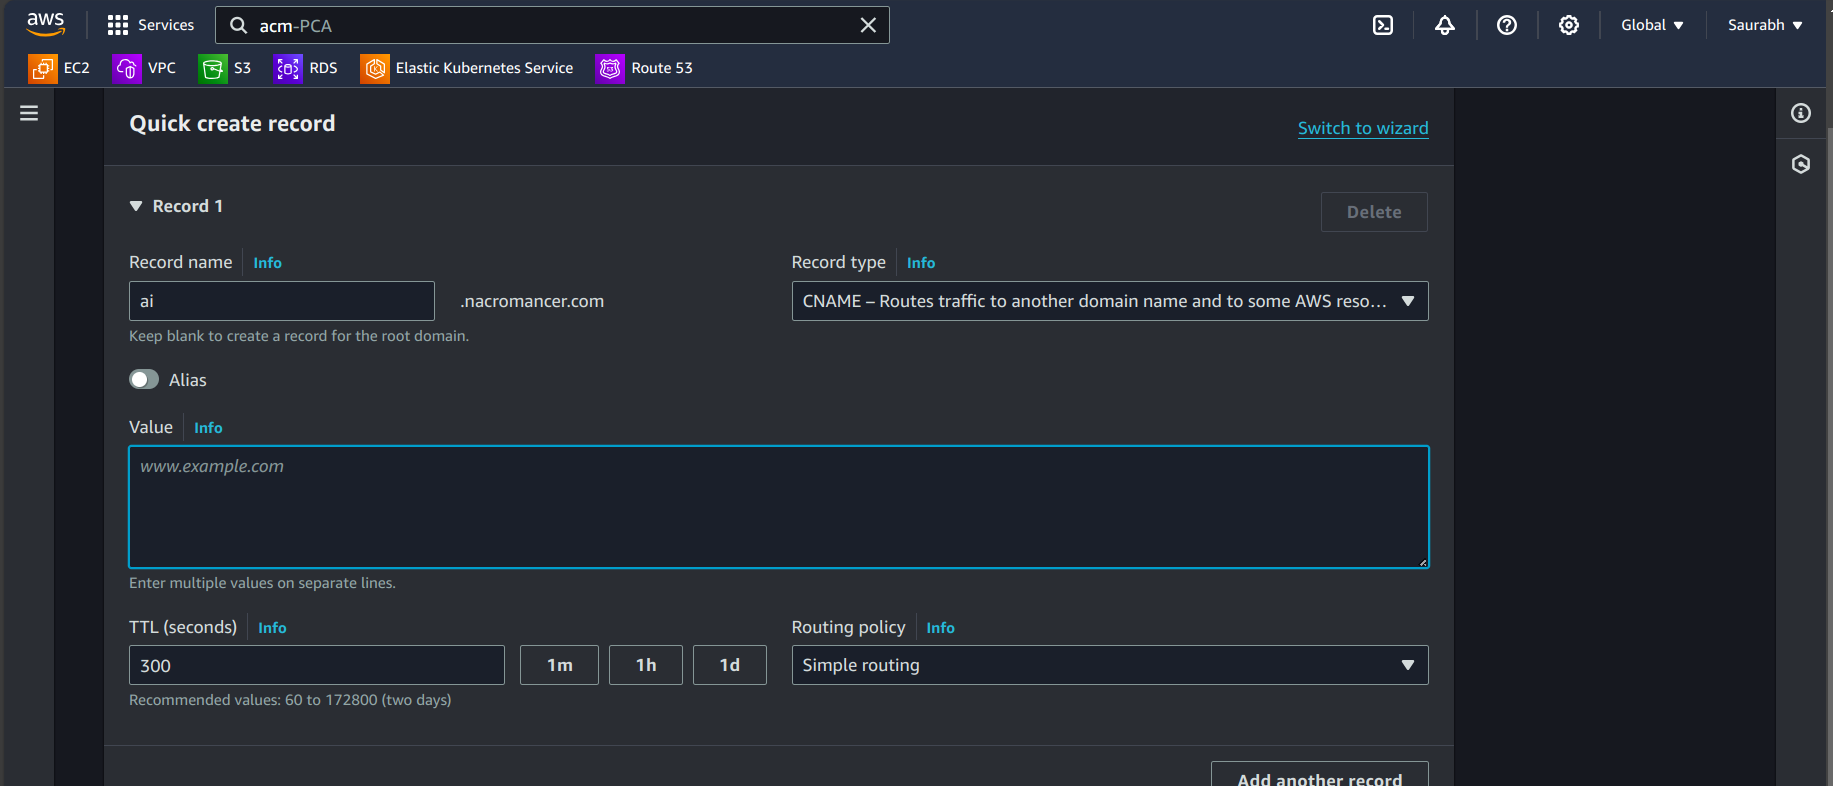
Configure Route53: As you remember we have got External LoadBalancer IP, so copy that and Go to Route53 -> Your Registered Domain -> Hosted Zone -> Create Records. Give a record Name Select Record Type and CNAME and Paste the External LoadBalancer IP in the
Valuesection. TTL should be 1m.
In my case:

Then apply all the above files one by one and after 2-3 minutes go to the browser and Hit your subdomain, then your application will be visible.
- Here we'll create a certificate using ACM and then integrate it with Route53
Update the service in the deployment file:
  apiVersion: v1
  kind: Service
  metadata:
    name: your-service-name
    namespace: your-namespace
    annotations:
      service.beta.kubernetes.io/aws-load-balancer-ssl-cert: arn:aws:acm:your-region:your-account-id:certificate/your-certificate-id
      service.beta.kubernetes.io/aws-load-balancer-ssl-redirect: "443"
  spec:
    type: LoadBalancer
    ports:
      - port: 80
        targetPort: 80
        protocol: TCP
      - port: 443
        targetPort: 80
        protocol: TCP
    selector:
      app: your-app-label
Configure Ingress
  #ingress.yaml
  apiVersion: networking.k8s.io/v1
  kind: Ingress
  metadata:
    name: app-ingress
    annotations:
      cert-manager.io/cluster-issuer: "letsencrypt-prod"
  spec:
    ingressClassName: nginx
    tls:
      - hosts:
          - Your-SubDomain
        secretName: secret-ai
    rules:
      - host: Your-Domain
        http:
          paths:
            - path: /
              pathType: Prefix
              backend:
                service:
                  name: chatbot-service
                  port:
                    number: 80
Configure Route53: As you remember we have got External LoadBalancer IP, so copy that and Go to Route53 -> Your Registered Domain -> Hosted Zone -> Create Records. Give a record Name Select Record Type and CNAME and Paste the External LoadBalancer IP in the
Valuesection. TTL should be 1m.
Then apply all the above files one by one and after 2-3 minutes go to the browser and Hit your subdomain, then your application will be visible.
In my case:

Publishing Your AI Application
With the domain, TLS certificate, and Ingress configured, your AI application should now be accessible via your custom domain securely.
Accessing Your Application:
Verify DNS Propagation:
- Ensure that your domain points to the correct AWS resources. You can check this using tools like
digor online DNS checkers.
- Ensure that your domain points to the correct AWS resources. You can check this using tools like
Open your browser:
- Visit
https://chatgpt.yourdomain.comto access your AI application securely.
- Visit
In my case:


Conclusion
Congratulations! You’ve successfully set up a custom domain, configured TLS for secure connections, and published your ChatGPT clone application using AWS services. With these enhancements, your application is not only accessible but also secure for users. In future articles, we can explore scaling your application, implementing monitoring solutions, or adding additional features. Stay tuned!